Friday, July 6, 2012

Summer's here! Slow Smoking on the BBQ: Why and How-To

Recently Tara Firma Farms, one of the two farms that I work on, asked all the employees to write an article for our weekly newsletter.  I thought that this would be a great excuse to get back to my overly neglected blog.  Enjoy!

 Slow smoked pork shanks over lettuce and homegrown backyard broccoli flowers.

Summer is here!  Slow Smoking on the BBQ: Why and How-To!

Every year, as soon as the weather gets nice (which is both subjective, and roughly year round for us in the beautiful Bay Area) my husband Eric fires up our Weber coal BBQ and goes to town!  Sometime last year, Eric mastered the art of slow smoking, and we have now found my favorite way to cook food.  This really simple technique is a fan favorite in our house, and we'd like to walk you through how it's done.  Please note that this is for use on coal BBQ's.  If you have a gas BBQ, you can purchase a smoke box for a similar effect.  Or better yet, you can purchase a coal BBQ for best taste. :)

We find that since the meat we get in our CSA box is of such incredible taste and quality, that very little is needed to be done prior to smoking it.  We really like to have the meat speak for itself.  Season ahead of time with a dry rub of your choice.  There are a variety of seasoned salts available in the farmstore that are great for this purpose, such as French Herb, Rosemary, and Garlic.  We also like a seasoning from Trader Joe's called 21 Seasoning Salute.

In his own words, here's how the Master gets it done :)

Slow Smoking - Why and How-To:

WHY
1) Great INTERNAL Moisture.  "Low and Slow" means exterior doesn't burn while bringing internal temp up.
2) Fantastic Color.  "Smoke Ring" just inside outer surface.
3) TASTES AMAZING.  Rub or marinade permeates COMPLETELY.  Because internal moisture is still present, all of the juices add to the flavor, so you really taste the meat.
4) It makes your neighbors insanely jealous, and makes your whole neighborhood smell UH-MAZING!

HOW-TO
In order to achieve good "smoking" conditions, you need two things.  WOOD CHIPS and *INDIRECT* heat.  The wood is important as it actually creates the smoke.  Not all wood is equal, also.  I prefer mesquite for chicken and either apple or pecan for pork.  (I don't really have a wood preference for smoking beef, yet).  I soak several handfuls of wood chips in water for at least 30 minutes and try to use large chunks.  I put these directly on the hot coals and replenish them when the smoke dies down.

Equally (if not more) important is the indirect heat.  If you put the meat right over the coals, it will cook quickly and unevenly and the results will not be positive.  I make sure to keep the meat as far from the heat as I can.  I keep this in mind when I lay out the coals.  For pork, I use a "two-zone" arrangement with all of the coals only on one side of the BBQ.  Then I put a metal pie tin half-full of water on the other side under the meat.  The water helps keep the air moist, which in turn keeps the meat moist.  The tin also catches the drippings which helps extend the life of the grill.  I do the same with quartered chicken.

For whole chickens, I set up the coals in a "Ring of Fire".  I dump the coals around the outer edge, adding some new coals to help fill all of the ring.  I add the same half-full pie tin to the center and put the bird above it.  The ring helps ensure equal heat all around the bird.  I also use an open, half full beer can to stand her upright.  (Technically, I use a stainless steel facsimile to avoid aluminum and dye, but you get the point.)

Keep the lid covered as much as possible to avoid losing that precious smoke!

For grilling those scrumptious fresh veggies, I tend to put them right over the coals as the meat is coming close to done.  The goal is to cook them quickly and efficiently.  They have different properties and can handle it.

QUICK NOTES:
1) As always, grass fed/pastured meat cooks faster than corn fed meat.  If you expect it to take an hour, assume it will be ready in 45 minutes.
2) Digital thermometers are your friend.
3) Practice often! (And have fun!)

 Enjoy!  Your lovely farmhands, Alexis and Eric Distad.

Alexis getting down on some smoked pork skin!  Believe me, it was incredible!


50/50 Burgers: A Love Story

I've recently made a few posts on my Facebook page, From Farm To Table, about my 50/50 burgers and have had some inquiries on how to make them.  So, here we goooooo!

I stumbled into 50/50 burgers last summer when I NEVER wanted to see another summer squash in my CSA box again.  But alas, they kept coming.  "What on earth can I do with all this?" I thought.  "Maybe I can hide them in some grass fed ground beef in burger form, similar to my meatloaf."


So out came the Cuisinart with the shredder attachment and in went all those beautiful green and yellow summer squashes.  As much shredded squash as I could cram in, one pound of grass fed ground beef, and salt and pepper to taste all went into a mixing bowl.  I kneaded them together, as if it were bread, until mixed throughly.

The burgers were spectacular!

Since then I've experimented with all different types of veg.  The more veg the better!  I love to put in whatever is seasonal.  This is a great trick to use if you have some veg leftover before you get your next CSA box, you have an abundance in your garden, you want to get some more vegetables in your diet, or you'd just like make 6-8 burgers out of that pound of grass fed ground beef!


Last night I made my 50/50 burgers with a bunch of beet greens, stems removed (I don't like the texture), and half each of white and red onions, both chopped.  Add in one pound of grass fed ground beef and sea salt and chili garlic sauce to taste.  (I tend to shy away from black pepper and use red pepper instead -- and I used to abhor spicy, too!).  I kneaded all the ingredients together for about 3 to 5 minutes until all the veg is incorporated in with the ground beef.  It might seem like this is more than the ground meat can hold.  But if it sticks, it fits!

I also made my first grass fed lamb burger the other day.  I put in a ton of fresh mint from my garden and pine nuts in it.  It was soooooo good! Play with it!  I've used chard, kale, beet greens, basil, mint, various fresh herbs, peppers, squash, garlic, and many many more.  All are delish!

Have fun, enjoy, and please let me know what you've tried and how it came out!

Wednesday, October 5, 2011

IVOFG: John Valenzuela and food forests

This week we had the privilege of listening to John Valenzuela,
president of the Golden Gate Chapter of The California Rare Fruit Growers Society. We discussed food forests and permiculture, as well as sampled apples that he and students brought from home (yummo!)
and finally took a trek out to our orchard. 
A food forest has seven layers, although a food forest needs to have at least three layers (big, medium, little)
1) Canopy or overstory (such as large fruit and nut trees)
2) Semi dwarf (such as peach, citrus, persimmon)
3) Fruiting shrubs
4) Herbaceous layer
5) Rhizomes (root veg)
6) Soil (ground cover)
7) Vertical layers

Food forests were inspired by the tropics, where the forests are super productive with foods, herbs, and medicinal properties.  We also discussed the Polynesians, who when traveling, were said to have 22 types of plants and animals they'd bring in their canoe to feed themselves in distant lands.  This sparked an internal question: What would my 22 canoe crops be?  What would yours be?

John said the number one item needed for the a food forest is water. "You got tho get your water right, or you got nothing right."  Wonderful ways to go about collecting war is to have a rainwater catchment system.  Another idea is grey water recycling--to use water from inside the house for outside water.  Gravity fed water is a great and simple system also.  How about a pond?  Grow fish for food and the fish water is great for plants.  "Do you have an excess of slugs?" John asked.  "Maybe instead you have an absence of ducks." Ducks!  Ducks are great for eating pests and they give you eggs!  Double win!  For more info on aquaphonics, please check out Max Meyers of NorCal Aquaphonics link below.

How about planting flowers?  Flowers are a wonderful habitat for the predators of pests (pest predators).  When planting flowers in your food forest, look for flowers that are very accessible for insect's small mouth parts.  It's very important to provide for the pest predators, because these guys have a longer, slower life cycle than the pests they hunt. Remember when planting your food forest, diversity makes it interesting.

Also, please make sure that you plant pairs or clusters of fruiting trees for pollination (plant sex!) and that tree planting is planting for decades away.  And as always, share  your harvest!

And lastly, I want to impart you with John's 3 VERY IMPORTANT rules for seed saving, planting, and propagating.  LABEL, LABEL, LABEL!

Please check out these other links for more info!

Regenerative Design Institute  

CA Rare Fruit Growers Golden Gate Chapter

CA Rare Fruit Growers Scion Exchange 

John Valenzuela's blog, Cornucopia Food Forest  

NorCal Aquaponics

Saturday, October 1, 2011

Summer Tomato Live: Why processed foods are so bad.

We lovelovelove Summer Tomato in our house. This is a quick 30 min Summer Tomato Live piece on why processed foods are so bad. Please have a listen. 

Check out more of Darya and Summer Tomato at http://summertomato.com!

Saturday, September 24, 2011

The Wonderful World of Freecycle

Freecycle. The word came to me one evening. I rushed to my computer and googled the word to see if something as cool as 'freecycle' could exist. By gum, it did!

What I learned was that Freecycle is a web based community forum or bulletin board where people can both offer and request items. Remodeling your kitchen? "OFFER: Kitchen Cabinets". Or you just had a weight change? "OFFER: Women's shirts, size medium". Or maybe you're doing some housecleaning? "OFFER: 2 years of back Yoga Journal issues". Need something for a project or looking for a new item? "WANTED: Picture Frames" or "WANTED: Newspaper for my wormbin" maybe even "WANTED: Redworms for my wormbin" or simply "WANTED: Travel Coffee Cup". You usually pick up at the home of the person who is giving it away, although I've even had things delivered to me!

The idea behind Freecycle is to keep things out of landfills. It's great to recycle your old collection of Yoga Journals, but isn't it better to give them to someone who could use them in their current incarnation?

In Marin County, we are very lucky to have such an active Freecycle group. It is superbly moderated by Nicole; groups.yahoo.com/group/marinfreecycle/ has over 5000 members, and averages about 200 offer, wanted, taken, promised and received posts weekly.

I love asking for things on Freecycle. Sometimes I get treasures, sometimes my search is fruitless, but very rarely do I ever receive duds. I also lovelovelove offering things on Freecycle. I believe that what you put into Freecycle, you get back. Personally I have Freecycled kitchen appliances (juicer, bread maker, refrigerator), a hot tub and a BBQ, a 1/2 a bag of kitty litter, books, houseplants, gift wrap and yoga DVDs, just to name a few. Nearly anything can be found in your community, if you know where to look. I strongly encourage you to find and frequent your own Freecycle community. If there isn't one in your area, then start one! The only cost is going to your community members' houses and picking up your new treasures. Plus, you'll save money, keep items out of the landfill and you just might meet your neighbors and make some friends in the process.


Tuesday, September 20, 2011

IVOFG: Making compost 131

This article was written by Alexis Distad for the Indian Valley Organic Farm and Garden student blog.

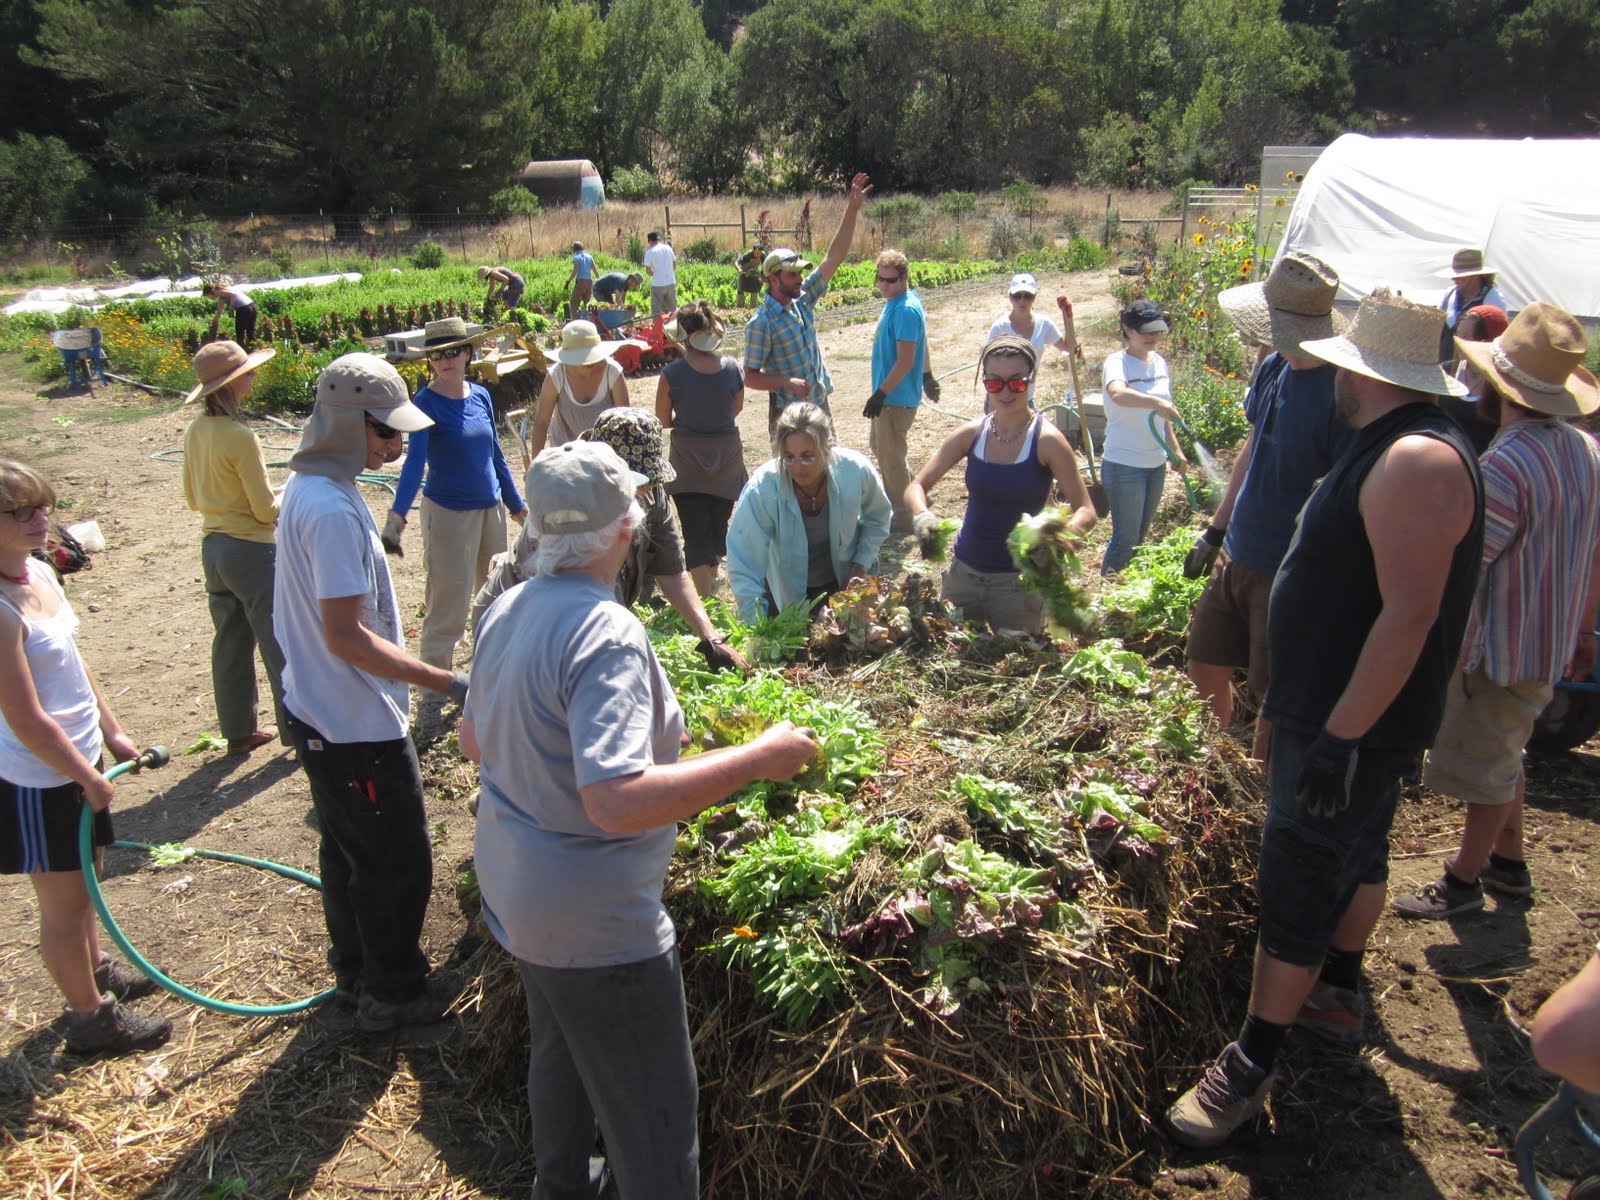
Today we made compost piles. We went out to the field to 'get down!' As a class we broke off into groups trimming chard back and removing bolted lettuce and basil. Sunburnt peppers and other green material were made into a huge green pile.

In three groups, we each laid out the structure for a 6'x6'x6' compost pile. First we went down the sunflower stalks.

Branches would have worked well also. The big guys work well to facilitate drainage. Next we add a layer about 2"-4" thick of brown matter. In our case the brown matter was hay (and then wood chips when the hay ran out).

Dry leaves would also do the trick. Then the pile is doused with a hose. Just enough water to well dampen but not drench the pile. The pile is then covered with a similarly thick layer of green matter. We used the large pile of greens that we had just pulled from the earth. Any garden greens will do fine. Again, douse with water. Next comes a similarly sized layer of manure. We used horse manure.

Then more water yet again. And the cycle goes on. Brown, green, manure. Brown, green, manure. Brown, green, manure. All then capped off preferably with hay, although some other brown matter would work also.

All this until the pile is (ideally) six feet tall.

As our three groups built up, some were in the rows uprooting more bolted lettuce for our green layers. All the work uncovered some rare critters.

We found a super fuzzy caterpillar, a praying mantis, and a camera shy frog, all in the rainbow chard!

After all the piles were completed we stood in a circle encompassing the piles, holding hands, offering blessings to our new piles.

These compost piles are made of 100% organic materials. Everything in it is of the earth, and will go back from whence she came. There is no plastic case that had to be made, shipped, purchased, assembled and eventually thrown away. Our piles are 100% au natural. Our piles will get turned weekly, although a pile this size can be turned every two weeks.

Lastly, an aerobic compost pile, such as ours, has to get to 131 degrees Fahrenheit for at least three days in order for it to do its do. It can get hotter, but never any cooler.

Friday, August 12, 2011

Twas the night before the CSA box...


So it's Thursday night. Farmday Friday is upon us, and we're about to come home with our CSA box full of *amazing* fresh, local, in season fruits, veg and pastured meats from Tara Firma Farms.

I open the fridge and inspect our veg bins to find three beautiful yellow carrots, two leeks, a bunch of bok choy, a nice round, fat green summer squash and some kale. I KNOW WHAT TO DO! I measure one cup of quinoa, place it in a small pot, and dump two cups of water atop the grain and bring to a simmer. Quinoa cooks just like rice, and if you're unfamiliar with it, it has a mild nutty flavor and is packed full with protein!

As the quinoa is cooking, I finely chop the two leeks, discarding their tops in my veggie freezer bag (which is always next to me collecting my scraps as I cook) for stock at a later date.

Leeks go into the saute pan with some homemade lard on a low heat until they caramelize, being stirred every so often so as they don't burn.

On another burner is my cast iron grill pan, loaded up with the summer squash, cut into large, fat coins. A little more lard to keep them from burning to the pan, turned once in a while, and they're good to go.

As those are going on the stove, I finely chop the bok choy, carrots and kale. Into the bowl they go! Followed by a generous fistful of flax seeds (sesame would work also, if you have it!) Next, the quinoa goes into the bowl, followed by the caramelized leeks and finally the grilled squash, all finely chopped. Tonight I topped it off with some goat cheese before adding the salt, pepper and lemon juice. Finally, I added the last plum from our fruit box (why not?!) and topped it all off with some Tabasco. It's delish!

I love these quinoa salads because I throw nearly anything and everything into it and it's so super healthy. I like a good 50-50 grain-veg ratio. The more veg, the better! It's a great way for me to eat my veg when salads get so mundane. They can very easily be prepared vegetarian or vegan and quinoa is gluten free. Plus, it's a great way to clean out the veg bin and make way for all the new yummies! I hope to make a quinoa salad a staple in our house. Very healthy, fresh, delish, filling and can change from week to week so as not to get repetitive. I have to thank my friend Jessi, who first turned me on to these. Thanks, Jess!

I feel a hankering for quinoa, mango, feta and cucumber with some kale. Let's see if I get cucumbers and kale in my box this week!