Wednesday, October 5, 2011

IVOFG: John Valenzuela and food forests

This week we had the privilege of listening to John Valenzuela,
president of the Golden Gate Chapter of The California Rare Fruit Growers Society. We discussed food forests and permiculture, as well as sampled apples that he and students brought from home (yummo!)
and finally took a trek out to our orchard. 
A food forest has seven layers, although a food forest needs to have at least three layers (big, medium, little)
1) Canopy or overstory (such as large fruit and nut trees)
2) Semi dwarf (such as peach, citrus, persimmon)
3) Fruiting shrubs
4) Herbaceous layer
5) Rhizomes (root veg)
6) Soil (ground cover)
7) Vertical layers

Food forests were inspired by the tropics, where the forests are super productive with foods, herbs, and medicinal properties.  We also discussed the Polynesians, who when traveling, were said to have 22 types of plants and animals they'd bring in their canoe to feed themselves in distant lands.  This sparked an internal question: What would my 22 canoe crops be?  What would yours be?

John said the number one item needed for the a food forest is water. "You got tho get your water right, or you got nothing right."  Wonderful ways to go about collecting war is to have a rainwater catchment system.  Another idea is grey water recycling--to use water from inside the house for outside water.  Gravity fed water is a great and simple system also.  How about a pond?  Grow fish for food and the fish water is great for plants.  "Do you have an excess of slugs?" John asked.  "Maybe instead you have an absence of ducks." Ducks!  Ducks are great for eating pests and they give you eggs!  Double win!  For more info on aquaphonics, please check out Max Meyers of NorCal Aquaphonics link below.

How about planting flowers?  Flowers are a wonderful habitat for the predators of pests (pest predators).  When planting flowers in your food forest, look for flowers that are very accessible for insect's small mouth parts.  It's very important to provide for the pest predators, because these guys have a longer, slower life cycle than the pests they hunt. Remember when planting your food forest, diversity makes it interesting.

Also, please make sure that you plant pairs or clusters of fruiting trees for pollination (plant sex!) and that tree planting is planting for decades away.  And as always, share  your harvest!

And lastly, I want to impart you with John's 3 VERY IMPORTANT rules for seed saving, planting, and propagating.  LABEL, LABEL, LABEL!

Please check out these other links for more info!

Regenerative Design Institute  

CA Rare Fruit Growers Golden Gate Chapter

CA Rare Fruit Growers Scion Exchange 

John Valenzuela's blog, Cornucopia Food Forest  

NorCal Aquaponics

Saturday, October 1, 2011

Summer Tomato Live: Why processed foods are so bad.

We lovelovelove Summer Tomato in our house. This is a quick 30 min Summer Tomato Live piece on why processed foods are so bad. Please have a listen. 

Check out more of Darya and Summer Tomato at http://summertomato.com!

Saturday, September 24, 2011

The Wonderful World of Freecycle

Freecycle. The word came to me one evening. I rushed to my computer and googled the word to see if something as cool as 'freecycle' could exist. By gum, it did!

What I learned was that Freecycle is a web based community forum or bulletin board where people can both offer and request items. Remodeling your kitchen? "OFFER: Kitchen Cabinets". Or you just had a weight change? "OFFER: Women's shirts, size medium". Or maybe you're doing some housecleaning? "OFFER: 2 years of back Yoga Journal issues". Need something for a project or looking for a new item? "WANTED: Picture Frames" or "WANTED: Newspaper for my wormbin" maybe even "WANTED: Redworms for my wormbin" or simply "WANTED: Travel Coffee Cup". You usually pick up at the home of the person who is giving it away, although I've even had things delivered to me!

The idea behind Freecycle is to keep things out of landfills. It's great to recycle your old collection of Yoga Journals, but isn't it better to give them to someone who could use them in their current incarnation?

In Marin County, we are very lucky to have such an active Freecycle group. It is superbly moderated by Nicole; groups.yahoo.com/group/marinfreecycle/ has over 5000 members, and averages about 200 offer, wanted, taken, promised and received posts weekly.

I love asking for things on Freecycle. Sometimes I get treasures, sometimes my search is fruitless, but very rarely do I ever receive duds. I also lovelovelove offering things on Freecycle. I believe that what you put into Freecycle, you get back. Personally I have Freecycled kitchen appliances (juicer, bread maker, refrigerator), a hot tub and a BBQ, a 1/2 a bag of kitty litter, books, houseplants, gift wrap and yoga DVDs, just to name a few. Nearly anything can be found in your community, if you know where to look. I strongly encourage you to find and frequent your own Freecycle community. If there isn't one in your area, then start one! The only cost is going to your community members' houses and picking up your new treasures. Plus, you'll save money, keep items out of the landfill and you just might meet your neighbors and make some friends in the process.


Tuesday, September 20, 2011

IVOFG: Making compost 131

This article was written by Alexis Distad for the Indian Valley Organic Farm and Garden student blog.

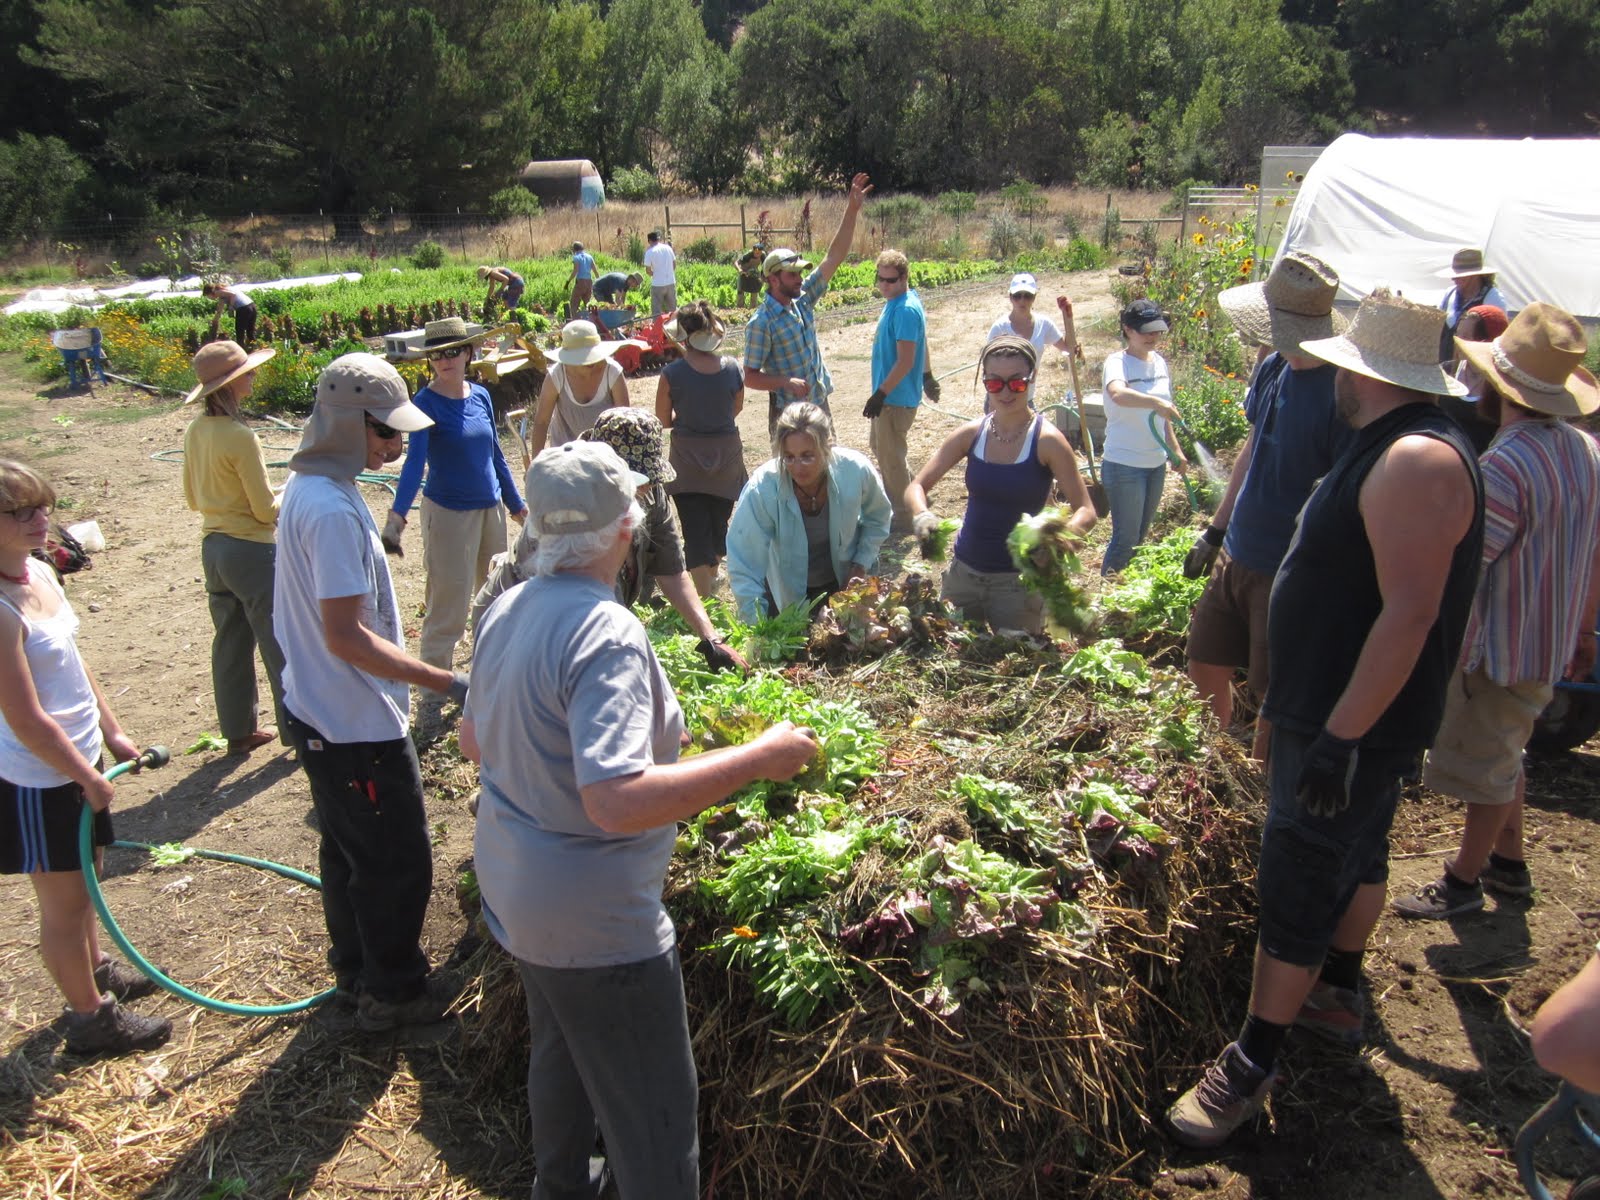
Today we made compost piles. We went out to the field to 'get down!' As a class we broke off into groups trimming chard back and removing bolted lettuce and basil. Sunburnt peppers and other green material were made into a huge green pile.

In three groups, we each laid out the structure for a 6'x6'x6' compost pile. First we went down the sunflower stalks.

Branches would have worked well also. The big guys work well to facilitate drainage. Next we add a layer about 2"-4" thick of brown matter. In our case the brown matter was hay (and then wood chips when the hay ran out).

Dry leaves would also do the trick. Then the pile is doused with a hose. Just enough water to well dampen but not drench the pile. The pile is then covered with a similarly thick layer of green matter. We used the large pile of greens that we had just pulled from the earth. Any garden greens will do fine. Again, douse with water. Next comes a similarly sized layer of manure. We used horse manure.

Then more water yet again. And the cycle goes on. Brown, green, manure. Brown, green, manure. Brown, green, manure. All then capped off preferably with hay, although some other brown matter would work also.

All this until the pile is (ideally) six feet tall.

As our three groups built up, some were in the rows uprooting more bolted lettuce for our green layers. All the work uncovered some rare critters.

We found a super fuzzy caterpillar, a praying mantis, and a camera shy frog, all in the rainbow chard!

After all the piles were completed we stood in a circle encompassing the piles, holding hands, offering blessings to our new piles.

These compost piles are made of 100% organic materials. Everything in it is of the earth, and will go back from whence she came. There is no plastic case that had to be made, shipped, purchased, assembled and eventually thrown away. Our piles are 100% au natural. Our piles will get turned weekly, although a pile this size can be turned every two weeks.

Lastly, an aerobic compost pile, such as ours, has to get to 131 degrees Fahrenheit for at least three days in order for it to do its do. It can get hotter, but never any cooler.

Friday, August 12, 2011

Twas the night before the CSA box...


So it's Thursday night. Farmday Friday is upon us, and we're about to come home with our CSA box full of *amazing* fresh, local, in season fruits, veg and pastured meats from Tara Firma Farms.

I open the fridge and inspect our veg bins to find three beautiful yellow carrots, two leeks, a bunch of bok choy, a nice round, fat green summer squash and some kale. I KNOW WHAT TO DO! I measure one cup of quinoa, place it in a small pot, and dump two cups of water atop the grain and bring to a simmer. Quinoa cooks just like rice, and if you're unfamiliar with it, it has a mild nutty flavor and is packed full with protein!

As the quinoa is cooking, I finely chop the two leeks, discarding their tops in my veggie freezer bag (which is always next to me collecting my scraps as I cook) for stock at a later date.

Leeks go into the saute pan with some homemade lard on a low heat until they caramelize, being stirred every so often so as they don't burn.

On another burner is my cast iron grill pan, loaded up with the summer squash, cut into large, fat coins. A little more lard to keep them from burning to the pan, turned once in a while, and they're good to go.

As those are going on the stove, I finely chop the bok choy, carrots and kale. Into the bowl they go! Followed by a generous fistful of flax seeds (sesame would work also, if you have it!) Next, the quinoa goes into the bowl, followed by the caramelized leeks and finally the grilled squash, all finely chopped. Tonight I topped it off with some goat cheese before adding the salt, pepper and lemon juice. Finally, I added the last plum from our fruit box (why not?!) and topped it all off with some Tabasco. It's delish!

I love these quinoa salads because I throw nearly anything and everything into it and it's so super healthy. I like a good 50-50 grain-veg ratio. The more veg, the better! It's a great way for me to eat my veg when salads get so mundane. They can very easily be prepared vegetarian or vegan and quinoa is gluten free. Plus, it's a great way to clean out the veg bin and make way for all the new yummies! I hope to make a quinoa salad a staple in our house. Very healthy, fresh, delish, filling and can change from week to week so as not to get repetitive. I have to thank my friend Jessi, who first turned me on to these. Thanks, Jess!

I feel a hankering for quinoa, mango, feta and cucumber with some kale. Let's see if I get cucumbers and kale in my box this week!

Thursday, July 28, 2011

Of Thursday Last

Little rock that spoke to me
in the tide pools of
Thursday Last

Amongst the hermit crabs
& scuttle crabs & rocks.
Little rock that spoke to me
in the tide pools of
Thursday Last

Red & vibrant in the light
& surf
pick me
I am beautiful.
Little rock that spoke to me
in the tide pools of
Thursday Last

Unique you were
in color
& glimmer
& shape
I tucked you away for safe keeping.
Surely your
beauty
is something to be celebrated.

Stashed away
in my suit case.
On my desk.
Little rock that spoke to me
in the tide pools of
Thursday Last

Ever so wise
you are beautiful.
You are something to be celebrated.
So why your celebration
struck
a lifeless blow?
Stowed away for only my enjoyment.
Little rock that spoke to me
in the tide pools of
Thursday Last

Red & vibrant in the light
unique you were
in color
& glimmer
& shape.
Little rock that spoke to me
in the tide pools of
Thursday Last

You have lost you twinkle.
The only glimmer of your
intrigue
lies as a sad salty reminder.

You belong in the ocean.
Here you are mundane,
Little rock that spoke to me
in the tide pools of
Thursday Last.

Wednesday, July 6, 2011

Worm Bin Diary


Yesterday I decided we need a worm bin. Having done some research on the differences between compost piles, worm bins and worm tubes, I'd narrowed my first food scrap receptacle to be a worm bin, either built from reclaimed wood (such as pallets, or planks), or a layered bin used from reclaimed buckets with holes in the bottom. I opted for the layered bins, as it just seemed easier. Reclaimed buckets are easy enough to find. I suggest your local freecycle community or your local nursery. These buckets will already have holes in them. No need to buy something when there is yet another fabu use for the 5 gallon nursery bucket.


This morning I mentioned my idea to our landlord and he gave me about 8 buckets, all saved in the gardening shed from previous plant homes and all of various sizes. There was a larger set of 4 seemingly random buckets and a few uniformly-sized buckets.


I am using the larger buckets, since I already have a lot of food scraps accumulated and saved from the compost pile for my new worm bin. I wonder if their unevenness will cause a problem down the road...? Out came the bowls of food scraps and into the 4 tiered bucket tower.


The way that the layer bin works is that the newest food scraps go in the top layer, and in our case, the first layer. Red worms are dumped in, and they go to town. Eat eat eat! As they eat the rotting food, they poop. The poop, or worm castings, is a luscious black dirt that your plants will love! As these guys are doing their thing, they will always go UP for more food, and it is our job to feed them with delicious plant kitchen scraps (they LOVE fruits and veg, breads, grains, cereal, coffee grounds and filter, tea bags, egg shells, and brown matter, such as cardboard, paper and dried leaves. They HATE meat, dairy, oils and fats, and feces) On to the next bucket, where more food scraps are added. The worms will crawl up through the holes in the bottom of the bucket and start eating the newer food, as they've turned the previous bucket into castings. And again, and again, until you have a 4 bucket rotation. Ideally, the entire process will be timed as such that when the top bucket is full and ready to cycle through, the bottom bucket will be all full of amazing castings. Additionally, if all goes according to plan (fingers crossed) the bottom bucket will also be vacated of all of its biological organisms, which are munching on the food above. Take the your bottom bucket full of worm castings and sprinkle it on some very lucky plants, or grow your saved seeds in it. Now place the newly emptied bucket on top and start filling with food scraps. And thus goes the worm bin cycle!

As previously stated, I chose the 4 larger buckets of varying size. My thought is that MAYBE I'll be able to dump them if necessary as I go. The smaller buckets just look so...small. We'll see!


After I got my bins and dumped in my food scraps, I left for Sustainable Fairfax. They have a very healthy worm bin and I wanted some of their worms, as they very generously offer them. I brought a hummus container from my recycling and started my journey.


When I got to Sustainable Fairfax I took my bracelets and rings off and dove into the earthy wooden chest in their backyard. Opening the box was exciting. Inside was a city, with everyone hard at work. On the top were soft roly polies, some the biggest I've ever seen, crawling on the cardboard egg crates and paper, tea bags and carrots, biodegradable bags and worm castings. Most of it was soil. Digging past the top layer and the roly polies are small banana slugs. Banana slugs? Who knew! Below the slugs were the red worms, quickly descending away from my grasp. They could sense my hesitation. It gave them a head start in our game of hide and go seek. Castings and as many little worms as I could wrangle went into my little plastic tub.


When I got home, I inspected my bounty and was very surprised to see how many colorless white baby worms were tangled in with my larger worms. And 2 medium sized roly polies, plus one itty-bitty baby roly poly were all visible also. The castings and critters got dumped into the bottom (currently only) bin so they could do their thing, eating my food scraps and pooping amazing soil as we speak. More food scraps, and soon more rotating tiers. News to follow!


Great links from "Edible Marin and Wine" and WSU on composting and worm bins!

http://www.ediblecommunities.com/marinandwinecountry/summer-2011/composting-101.htm
http://whatcom.wsu.edu/ag/compost/Redwormsedit.htm
http://whatcom.wsu.edu/ag/compost/easywormbin.htm
http://www.wikihow.com/Make-Your-Own-Worm-Compost-System